Thursday, December 31, 2009
25.9 KW
Ok, the other day we had another really good day for the panels and they produced 25.9 kw that day. Today and yesterday were cloudy and rainy.
Saturday, December 26, 2009
FIrst Week
Well, the system has been up and running for 1 week now and the totals are listed below.
We used a total of 202 kw as indicated by the Entergy meter.
We delivered 84 Kw to the Entergy grid.
The system produced a total of 133.9 Kw.
This saved a total of 227.6 lbs of CO2.
I am pleased with the results considering this is during the winter solstice and several days of rain and clouds. This is also during the holiday season where we had a party and we are pretty much here at home most of the time.
On a good clear cool day the system produces about 25.23 Kw each day in the short days of winter.
Friday, December 18, 2009
First Day 18kw
Today I comissioned the system. No problems at all. I was off work today and was able to monitor the system. Today is December 18 2009, and winter solstice is very near. The irradiation factor was excellent today. Crystal blue skies, no clouds, cool temps. So pretty much this was an excellent day to get a reading on how the system will perform near the shortest day of the year. The system yield the most power output of 4320 kw at 1230 pm today. Total Kw hours credited to the Entergy meter was 18. Not bad.
Thursday, December 17, 2009
Install Complete
The install is now completed


The install is now done. I have the signature from the Parish inspector and Entergy engineering has reviewed the design and their inspector came out today for the inspection. All was good and he said that this is one of the better installations that he has seen. The service meter was exchanged for a meter that records both incoming and outgoing energy use. I plan to commission the system tomorrow.
Friday, December 11, 2009
Update
This is a view of the wiring of the AC Disconnect. "Line" at the top. "Load" (to inverter) at bottom. Used #8 stranted copper.
 System grounding is important. #6 Copper.
This is a photo of the wiring of the Sunny Boy DC disconnect.
 Another view of DC disconnect.

Installation in process
 Another good view of the AC disconnect.


I have now installed the Sunny Boy inverter and wired it per the manual. Both strings are attached appropriately to the DC cut off switch. All conduit is attached to the wall and secure. I also contacted and visited the Parish inspectors office and paid the fee for an inspection and electrical permit. The gentleman did arrive and examined the install and he had no issues with the work that was performed. He signed the permit and I asked him to go ahead and sign the forms that require his signature for the Entergy net metering application. He gladly performed the signatures needed and was courteous through out the entire inspection.
I have also contacted Entergy with the completed application and net metering agreement and faxed this to my assigned solar representative. Again, the Entergy representative was extremely helpful and accommodating. From what I understand, the Entergy representative is going to submit the application and technical data to the Entergy engineers for verification of grid tie compliance. Once this is done, a meter will be supplied by the Entergy technician and the net metering agreement will be signed. At that point I may commission the system. I am now seeing the light at the end of the tunnel.

 System grounding is important. #6 Copper.
This is a photo of the wiring of the Sunny Boy DC disconnect.
 Another view of DC disconnect.
Installation in process
 Another good view of the AC disconnect.


I have now installed the Sunny Boy inverter and wired it per the manual. Both strings are attached appropriately to the DC cut off switch. All conduit is attached to the wall and secure. I also contacted and visited the Parish inspectors office and paid the fee for an inspection and electrical permit. The gentleman did arrive and examined the install and he had no issues with the work that was performed. He signed the permit and I asked him to go ahead and sign the forms that require his signature for the Entergy net metering application. He gladly performed the signatures needed and was courteous through out the entire inspection.
I have also contacted Entergy with the completed application and net metering agreement and faxed this to my assigned solar representative. Again, the Entergy representative was extremely helpful and accommodating. From what I understand, the Entergy representative is going to submit the application and technical data to the Entergy engineers for verification of grid tie compliance. Once this is done, a meter will be supplied by the Entergy technician and the net metering agreement will be signed. At that point I may commission the system. I am now seeing the light at the end of the tunnel.
Sunday, December 6, 2009
All Panels UP


Today I finished installing all 24 panels. I started at nine am and finished at seven am. The second half of the installation went much faster than the first in that I had figured out how to avoid some errors that had to be corrected.
To do: Hang the 150 pound Sunny Boy invertor on the mounting bracket. Install the dc strings in the Sunny Boy. Install the wiring from the Sunny Boy to the AC cut off switch. Get an inspection from the parish electrical inspector. Contact Entergy for grid tie approval and their insertion of the meter.
Saturday, December 5, 2009
Panel Going Up


Today I received my splice plates and was able to to complete the installation of the rails, run the #6 copper ground and begin installing the panels. I checked the Voc of each panel prior to installation. All 33 volts. I have 6 of the 24 panels up. Tomorrow I will video the installation of the panels, I am doing this solo on a 45 degree pitch roof. (Quite a challenge but doable). Each panel weighs 40 pounds. Not heavy but very awkward on a 12/12 pitch roof. Solar Electric Supply from California has been very helpful througout the install, They have treated me fairly in all transactions. I highly recommend them for your solar needs. The photo's show me checking the Voc Open circuit voltage of each panel. All were 33 Volts.
Monday, November 30, 2009
Panels to arrive tomorrow


The panels are to arrive tomorrow per freight from Con-Way freight. Today after work I was able to run a segment of the ground wire through the conduit from the roof through the condit to the inverter location. Basically I need to install the support railing and the #6 copper ground wire to the railing using the grounding lugs but I need the railing splice connectors and grounding lugs. (they have not come in from the shipper yet). Once the ground wire is installed, I can then install the panels and attach the ground to the panels using the grounding lugs as well. I am taking photo's as I go. I will upload the photo's later.
Sunday, November 29, 2009
All Stanions Up

All the stanions are now installed and properly flashed. This took some doing and was not as easy as I thought. I also installed the flexible EMT conduit and ran the mc cables through the conduit to the exit near the inverter location. I also was able to mount the sunny boy stainless steel inverter mount. This SMA inverter is excellent quality. The Sauare D AC disconnect is also mounted near the service meter base. Photo's to follow.
Wednesday, November 25, 2009
24 Stanions Now Installed
Sunday, November 22, 2009
Installing More Stanions
Friday, November 20, 2009
System Arrives

Today the system arrived via Federal Express Freight. No problem unloading the components to my trailer. Had lift gate service. I unpacked the system components and verified all was present compared with the shipping list. There was one component not shipped, I notified the solar provider company and the item was immediatly shipped with no questions asked. I began with installing the fast jacks and actually was able to install 4 of the 48 required. I am not able to work on the project tomorrow, I have to attend a conference for my profession. I am having trouble with obtaining the assistance of a solar electrician. I called the solar electrician for this area and he told me that he would not attempt to assist in the installation since he was not the person whom sold the system to me. I had no idea I would run into this problem. According to my state regulations related to solar installation, A homeowner may install his own solar system on his residence but I would like to have a certified solar electrician perform the actual grid tie. I am not sure how all of this is going to pan out. I live in a rather small city and I think he is the only certified solar electrician around. At any rate I am going to keep on working on the installation when I get time.
Saturday, November 14, 2009
NEC Codes
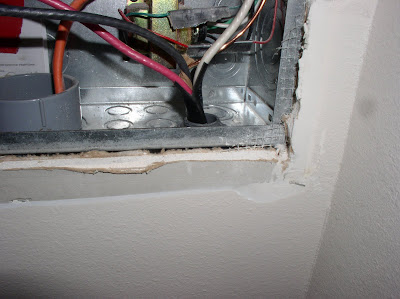
I am awaiting the arrival of the system and trying to take advantage of this time to plan every detail of the install so there will be no surprises. I have been reading the NEC codes related to solar installation and I want all codes complied with. These codes are written for safety and performance of the system. Throughout the installation all NEC codes shall be complied with. Today I had a local solar installer come give me his thoughts on the system and he agreed with all that I have planned. The engineers called for #8 thwn-2 wire to be the conductor from my load center to the AC disconnect switch. Today I made access to the load center by removing a window of sheet rock beneath my load center. I then accessed the location where the conductor would exit the wall to the outside where the ac disconnect is located. When I built my house, I put a 1" hole in the brick for this access. I ran 3/4 inch rain tight flexible conduit from the exterior of the house through the 1'' access hole to the load center and properly secured to the knock out lug. The backfeed will be through a 30 amp two pole breaker that was placed in the load center. I did not connect to the conductor to the 30 amp breaker. I marked with chaulk the outline of the disconnect and the inverter on the brick. I then ran #8 thwn-2 wire through the flexible conduitand have it ready for the connection to the AC disconnect when available. All of the connections shall be verified by a licensed electrician to verify all NEC codes were complied with.
Note: My load center has a 200 amp main breaker. This will support up to 40 amps of back feed. If you have a 100 amp main breaker on your load center, the backfeed breaker will be limited to 20 amps.
Note: My load center has a 200 amp main breaker. This will support up to 40 amps of back feed. If you have a 100 amp main breaker on your load center, the backfeed breaker will be limited to 20 amps.
Thursday, November 12, 2009
Flashing Arrives


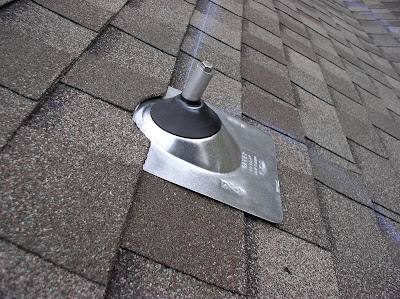
Today the flashing arrived. I choose to use the 4 1/2 in roof jack stanions for my installation. I definitly wanted this set-up because this combination along with the roof flashing will make for a durable and leak proof roof penetration attachment. I do not want anything screwed into my roof without being properly flashed. Reguardless of what other claim, flashing is the best way to protect you roof. I like the fact that the panels will be at least 4 1/2 inches off of the roof for cooling purposes. I did not want the panels mounted near the roof surface due to the heat that can build up on our roofs that lowers the efficiency of the solar panel. The wire transfer of funds occured today. Hopefully the system will be shipped soon.
The photo's show basics of how I installed the roof flashing and fast jacks. I used a chaulk line to be sure all is straight and square. I was surprised of the quality of the fast jacks, all solid aluminum, with all stainless fasteners. My roof rafters are spaced 16 inches on center. I had attic acces to these as well. I started by drilling a small hole near the rafter through the roof and used this location to measure the remainder of the rafters every 16 inches. I only missed about 3 or 4 through the entire roof. Since all will be flashed, it did not matter that I missed those 4 rafters, although I did seal the holes with sealant.
Wednesday, November 11, 2009
System Purchase


This blog will begin with the actual purchase of the solar system. There are many task that need to be completed prior to actually ordering your system including permits, state and local codes etc. There are many decisions that need to be addressed prior to deciding which solar system is best for you. There are other blogs related to this subject and I will not belabor that phase of your education. The main purpose of this blog is to educate a homeowner on what is actually required to install a system on his residence. I hope this blog educates and entertains the perspective homeowner related to solar residential grid interconnection process. Today I wired the money to the company that sold my system to me. This systems initial cost of the system was 19,200.00. This is for a 5.04 KW grid tie interconnection system that consist of 24-210w Kyocera Panels a Sunny Boy 5 kw inverter and racking and other balance of system components. I purchased this equipment from Southern Electrical Supply in California. The system must be up and running with all approvals by the end of the year or I will not receive my state or federal incentives at tax season. We shall see how this works out. I have never installed a solar panel system but I have read many books and nec codes related to the subject as well as read many articles provided by suppliers that also provide specific knowledge related to the installation.
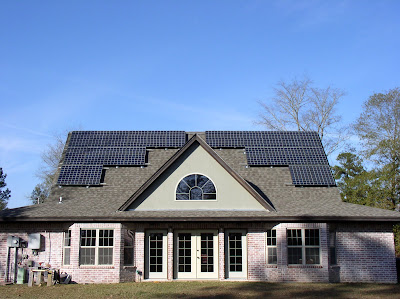
I plan to do the install and hire a solar electrician to perform the electrical connections. Solar is not that popular here in North Louisiana so we will see what type of obsticles we we encounter. Just going on faith and what I know is the right thing to do. These photo's are of the south facing roof of the install.
I hope you enjoy the blog.
Subscribe to:
Comments (Atom)


